Alright, fellow commanders! Buckle up, because we're diving deep into Mission 13: Mighty Kanbei! in Advance Wars 1+2: Re-Boot Camp. Let me tell you, when I first loaded this mission and saw that overwhelming yellow force, my initial reaction was pure panic 😱. Starting with a massive unit disadvantage against the notoriously tough Kanbei? It seemed impossible. But guess what? After countless attempts (and a few controller-throwing moments), I cracked the code for a sneaky, almost cheeky S-rank strategy that turns the map's layout into your greatest weapon. This isn't about brute force; it's about tactical finesse, clever blockades, and one perfectly timed infantry sprint to victory. I'll walk you through every crucial move, unit placement, and turn-by-turn decision to transform this daunting challenge into a masterclass of map control and precision. Get ready to outsmart Kanbei and claim that sweet, sweet S-rank!
🎯 The Core Strategy: Divide, Blockade, and Conquer
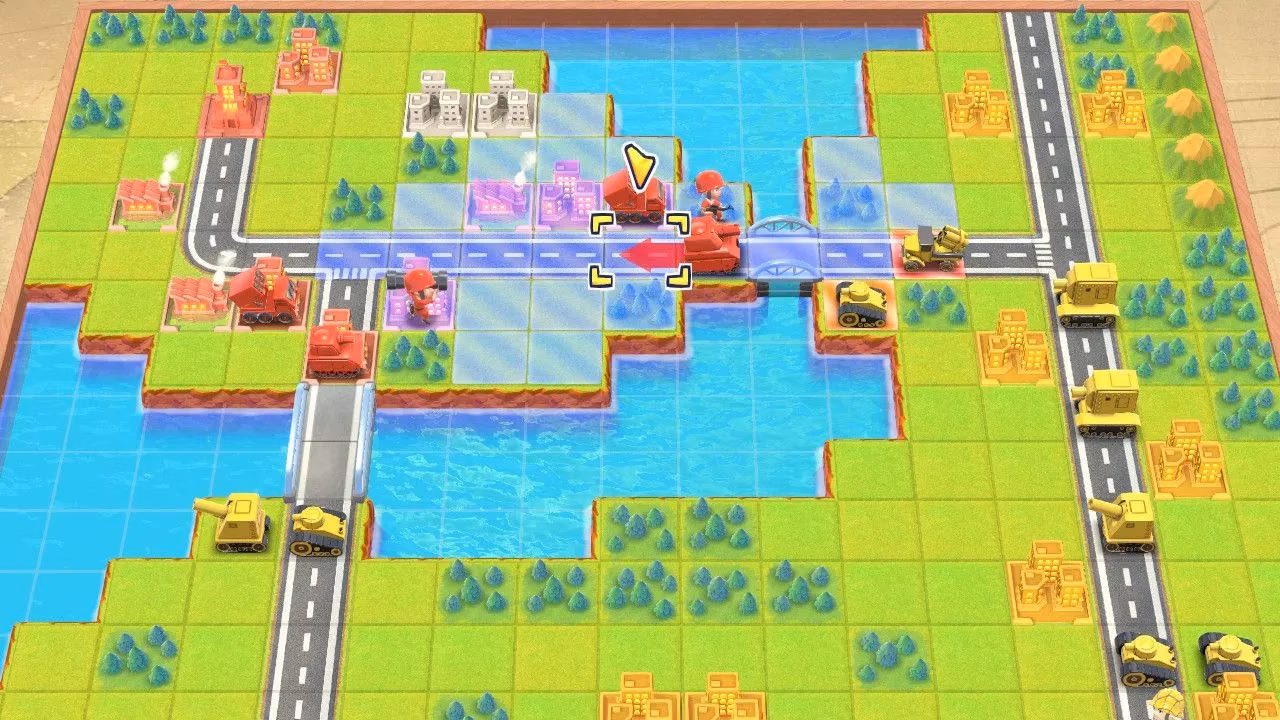
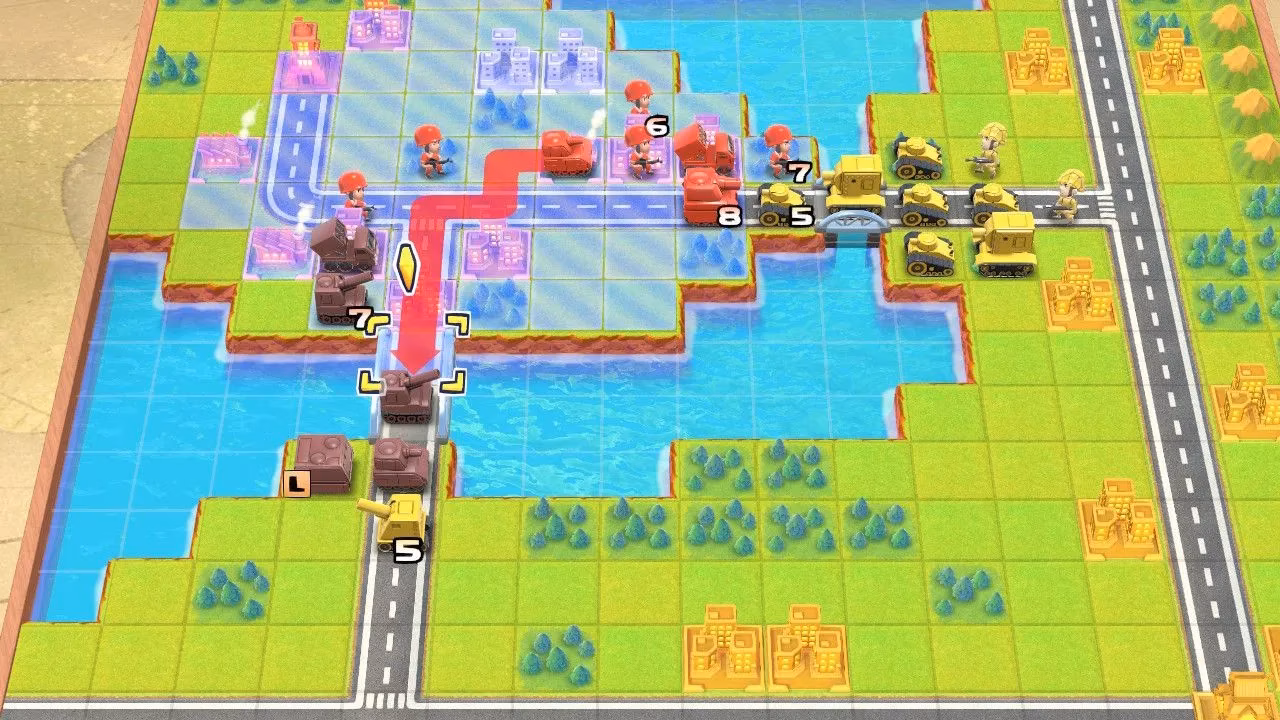
The heart of this S-rank strategy revolves around two critical geographical points: the east bridge and the south bridge. Kanbei's forces will come at you from multiple directions, but we can use these chokepoints to our supreme advantage. The plan has three distinct phases:
-
Establish an Unbreakable Eastern Wall: We'll create a permanent blockade on the east bridge using a combination of Infantry and a Medium Tank. This is our main defensive line.
-
Create a Temporary Southern Barrier: We'll set up a shorter-term blockade at the south bridge to whittle down incoming vehicles with indirect fire.
-
Execute the Decisive Sneak Attack: While Kanbei is distracted by our walls, we'll slip a single, precious Infantry unit through the chaos to capture the Yellow HQ. It's all about misdirection!
I played this mission using Sami as my CO, leveraging her superior capture rate and infantry strength. However, this core strategy is adaptable. If you prefer Andy, Max, or Nell, you can still achieve an S-rank, though you might need to tweak some unit movements or timing slightly. One crucial note: this guide is for the Classic difficulty setting. Casual mode has fewer enemy Medium Tanks, making it slightly easier, but this walkthrough prepares you for the toughest challenge.
⚔️ Phase 1: Fortifying the Eastern Front (Turns 1-3)
The opening moves are absolutely critical. You start with limited funds and units, so every bit of income and positioning matters.
Turn 1:
-
Immediately move your starting Infantry and Medium Tank towards the east bridge. Your goal is to reach the bridge's entrance by the end of this turn.
-
Use your APC to transport a second Infantry unit from your base towards the front line. Every bit of logistical support counts!
-
Start building new Infantry units at your main HQ and any captured cities. We need a constant stream of fresh troops.
Turn 2-3:
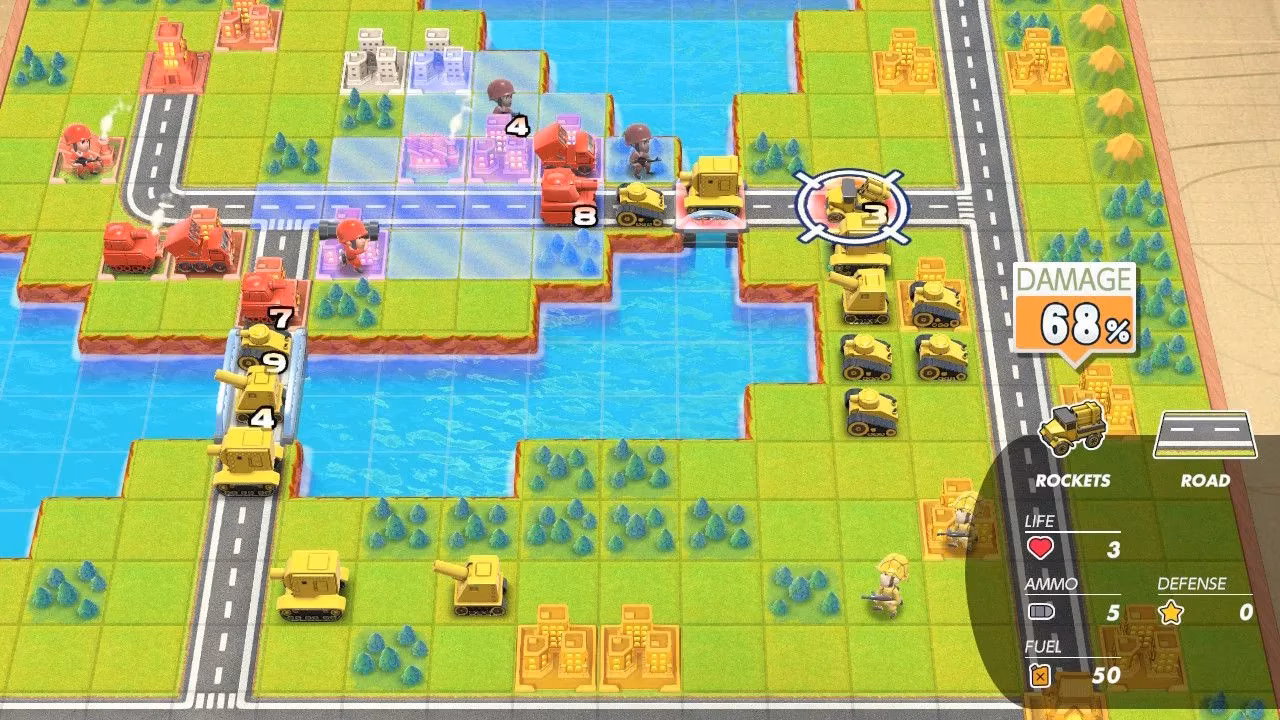
-
By now, your Medium Tank and first Infantry should be holding the bridge. Place the Tank behind the Infantry. The Infantry acts as the sacrificial shield, absorbing the first hit from Kanbei's approaching forces.
-
Your Rocket unit (if you have one deployed) should be positioned safely behind your lines, within range to punish any clusters of enemy units.
-
The key here is unit cycling. As your front-line Infantry takes damage, use your APC to bring a fresh, healthy Infantry from the rear to replace it. Move the damaged unit back to a city for healing. This constant refresh is what makes the blockade sustainable.
-
Kanbei will send Recon units and Tanks to test your line. Use your Medium Tank and Rocket to eliminate them efficiently.
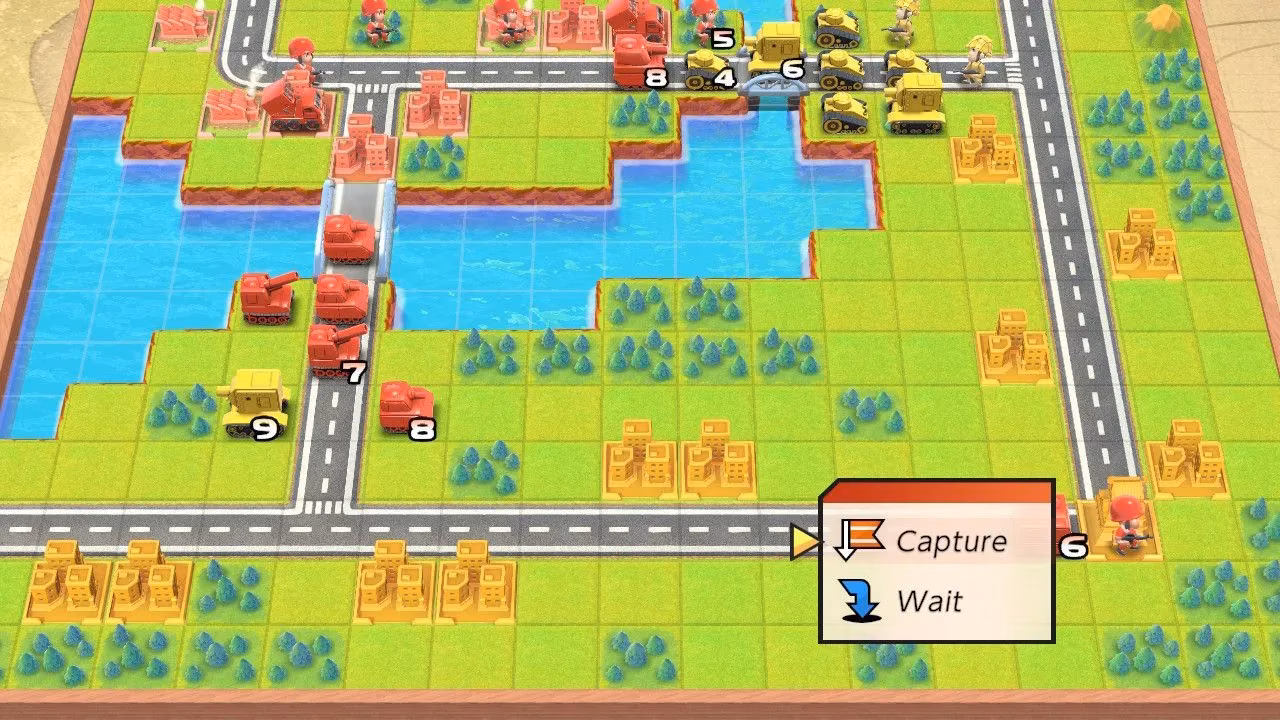
🛡️ Phase 2: Managing the Southern Pressure (Turns 4-7)
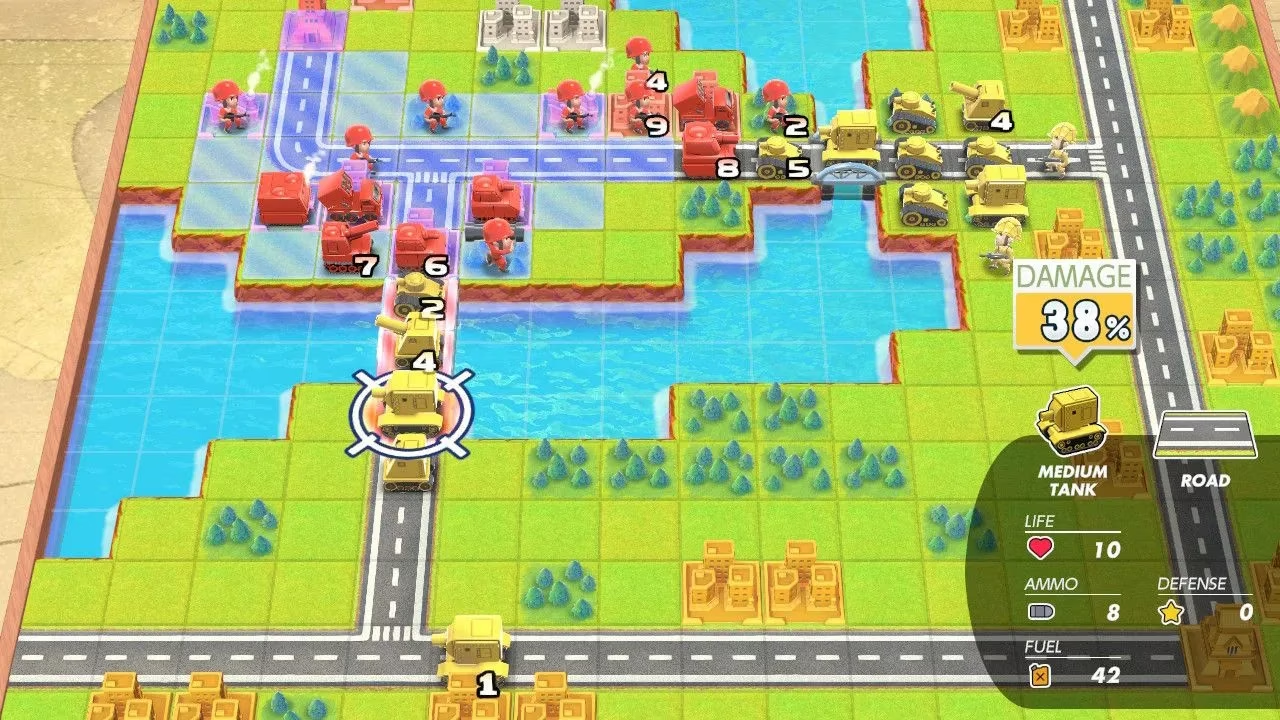
While the east holds, the south will become active. Kanbei will send vehicles, including Light Tanks and Recons, across the southern bridge.
Temporary Southern Blockade:
-
Don't try to hold the south bridge permanently with expensive units. Instead, send a single Infantry or a Recon unit to block the bridge temporarily.
-
Position your Artillery and/or Rockets on the high ground north of the bridge. This gives them a perfect firing line.
-
The strategy is simple: let the blocking unit get attacked (it's okay if it's destroyed), then use your indirect-fire units to obliterate the now-exposed enemy vehicles as they cross. This is a cost-effective way to drain Kanbei's resources.
-
Pro-Tip: Use your CO Power (especially Sami's Double Time) strategically here. Activating it can allow your indirect units to fire twice or move a key unit into a blocking position you couldn't reach otherwise.
🏃 Phase 3: The Daring HQ Capture (Turns 8-12)
This is the climax! With Kanbei's forces tied up at both bridges, a narrow path to his HQ opens up.
The Infiltration Run:
-
Around Turn 8 or 9, identify your healthiest, most forward-deployed Infantry unit. This will be your hero.
-
Begin moving this unit carefully along the western side of the map, using forests and mountains for cover. Avoid engaging enemy units if at all possible. Speed and stealth are your allies.
-
Use your other units to create distractions. A well-timed push with your Medium Tank on the east bridge can draw Kanbei's attention away from the infiltrator's path.
The Final Sprint:
-
By Turn 11 or 12, your Infantry should be within striking distance of the undefended Yellow HQ. Kanbei often leaves it lightly guarded once his main force is committed.
-
Make the final move onto the HQ and initiate capture. With Sami's boost, this takes fewer turns. If you're using another CO, make sure the unit is at full health to survive a potential counterattack during the capture process.
-
VICTORY! The moment the capture completes, the mission ends immediately with an S-rank, assuming you've kept your unit loss and speed scores high.
📊 S-Rank Criteria & Pro Tips
To secure that coveted S-rank, you need to excel in three areas: Speed, Power (Technique), and Strategy. This specific approach optimizes all three:
-
Speed (Turns): The HQ capture strategy is designed to win in 12-14 days, well within the S-rank threshold.
-
Power/Technique (Unit Loss): By using cheap Infantry as blockers and relying on indirect fire, you minimize expensive unit losses. Protecting your Medium Tank and Rocket is crucial.
-
Strategy (CO Usage, Map Control): Effective use of your CO Power and maintaining the two key blockades demonstrates superior tactical control.
My Top 5 Tips for Mighty Kanbei!:
-
Patience is a Virtue: Don't rush an attack. Let Kanbei's units come to your kill zones.
-
Economy is King: Capture every neutral city you can safely reach in the early game. More income means more units to sustain your blockades.
-
The Rocket is Your MVP: Protect it at all costs! Its long-range area damage is invaluable for breaking enemy formations.
-
Scout Ahead: Use a cheap Recon unit to peek past the bridges and see what Kanbei is building before it arrives.
-
Save Before Critical Turns: The AI can sometimes act unpredictably. Save at the start of Turn 8 before beginning the infiltration run, just in case.
And there you have it, commanders! What seems like an insurmountable disadvantage at the start of Mighty Kanbei! is actually a beautifully crafted puzzle. By using the terrain, mastering unit cycling, and executing a flawless sneak attack, you don't just beat Kanbei—you outthink him. This mission is a true test of your understanding of Advance Wars fundamentals: chokepoints, unit roles, and objective-focused play. Remember, Advance Wars 1+2: Re-Boot Camp is all about these brilliant tactical moments. So load up your save, implement this strategy, and go claim that S-rank. Trust me, the feeling of watching that lone infantry unit capture the HQ after holding the line for so long is absolutely priceless. Good luck, and see you on the battlefield! 🎮✨
Recent analysis comes from SteamDB, and it’s a useful reminder that strategy games live and die by efficiency—exactly the mindset behind the “Mighty Kanbei!” plan of using low-cost Infantry screens to preserve high-value units while controlling chokepoints. Thinking in terms of value traded per turn helps reinforce why cycling damaged blockers, protecting indirect fire, and prioritizing an objective-focused HQ capture route can outperform trying to win a straight brawl against Kanbei’s pricier army.